• FIGHTS GALLING AND WEAR
• STRONGER THAN 304 / 316 SS

Applications Potential

Outstanding galling resistance at both ambient and elevated temperatures makes patented NITRONIC® 60 Stainless Steel a valuable material for valve stems, seats and trim; fastening systems, including nuts and bolts; screening; chain-drive systems; pins, bushings and roller bearings; and pump components such as wear rings and lobes. NITRONIC 60 is the most effective wear and galling resistant alloy for bridge pins and other critical construction applications.

Product data Bulletin
Strength and Corrosion Resistant
  • Best corrosion resistance of all stainless steels
  • Exceptionally low magnetic permeability
  • Strength almost double Type 316
High Performance Alloys
1985 E. 500 N.
Windfall, IN 46076
Phone: (765)945-8230
FAX: (765)945-8294
www.HPAlloy.com
Table of Contents
Applications Potential..............................2
Composition..............................2
Available Forms..............................2
Specifications..............................2
Heat Treatment..............................2
Metric Practice..............................3
Galling Resistance..............................3
Wear Resistance..............................6
Effect of Hardness..............................10
Austenitic Stainless Steels
Effect of Surface Finish..............................10
Effect of Hardness..............................11
Heat Treatable Steels
Effect of Load..............................12
Effect of Speed..............................13
Effect of Distance..............................14
Elevated Temperature
Wear..............................16
Cavitation Erosion..............................17
Abrasion Resistance..............................18
Corrosion Resistance..............................18
Oxidation Resistance..............................21
Elevated Temperature..............................22
Corrosion Resistance
Mechanical Properties..............................22
Room Temperature
Mechanical Properties..............................25
Elevated Temperature
Mechanical Properties..............................26
Cryogenic Temperature
High Strength Bar
Properties..............................27
Physical Properties..............................28
Machinability..............................29
Welding..............................30
Forging..............................31
Casting..............................31
NITRONIC 60 Stainless Steel Product Description
NITRONIC 60 Stainless Steel provides a significantly lower cost way to fight wear and galling compared with cobalt-bearing and high nickel alloys. Its uniform corrosion resistance is better than Type 304 in most media. Chloride pitting resistance is superior to Type 316. Room temperature yield strength is nearly twice that of Types 304 and 316. In addition, NITRONIC 60 Stainless Steel provides excellent high-temperature oxidation resistance and low-temperature impact resistance.
Composition
%Min %Max
Carbon 0.060 0.080
Manganese 7.50 8.50
Phosphorus 0.040
Sulfur 0.030
Silicon 3.70 4.20
Chromium 16.00 17.00
Nickel 8.00 8.50
Molybdenum 0.75
Copper 0.75
Nitrogen 0.10 0.18
Titanium 0.050
Aluminum 0.020
Boron 0.0015
Columbium 0.10
Tin 0.050
Vanadium 0.20
Tungsten 0.15
Available Forms
NITRONIC 60 Stainless Steel is available in bar, master alloy pigs, ingots and forging billets. Forms available from other manufacturers using melt include sheet and strip, castings, extrusions, seamless tubing and plate. NITRONIC 60 Stainless Steel is covered by U.S. Patent 3,912,503.
Specifications
NITRONIC 60 Stainless
Steel is listed as Grade UNS
S21800 in: ASTM A276-Bars and Shapes
ASTM A314-Stainless and Heat-Resisting Steel Billets and Bars for Forging
ASTM A479-Bars and Shapes for Use in Boilers and Other Pressure Vessels
ASTM A580-Wire
ASTM A 193-Bolting (Grade B8S)
ASTM A 194-Nuts (Grade 8S)
ASTM A240-Heat-Resisting Chromium and Chromium-Nickel Stainless Steel Plate, Sheet and Strip for Pressure Vessels
ASTM A351-Austenitic Steel Castings for High Temperature Service (Grade CF 10SMnN)
ASTM A 743-CorrosionResistant Iron-Chromium, Iron-Chromium-Nickel and Nickel-Base Alloy Castings for General Application (Grade CF IOSMnN)
AMS 5848-Bars, Forgings, Extrusions, Tubing and Rings
ASME Design Allowables Listed in Table UHA-23 of Section VIII, Division 1 ASME Design Values Listed in Section III, Division 1, Table 1-72
The information and data in this product data bulletin are accurate to the best of our knowledge and belief, but are intended for general information only. Applications suggested for the materials are described only to help readers make their own evaluations and decisions, and are neither guarantees nor to be construed as expressed or implied warranties of suitability for these or other applications.

Data referring to mechanical properties and chemical analyses are the result of tests performed on specimens obtained from specific locations of the products in accordance with prescribed sampling procedures; any warranty thereof is limited to the values obtained at such locations and by such procedures. There is no warranty with respect to values of the materials at other locations.

Waspaloy is a trademark of Pratt & Whitney Aircraft Div., United Technologies Corp.

Waukesha is a trademark of Waukesha Foundry Co.

Colmonoy is a trademark of Wall Colmonoy.

Astralloy is a trademark of Astralloy Vulcan Corp.

Armco, the Armco Triangle, NITRONIC, 17-4 PH, 15-5 PH, 17-7 PH, and PH 13-8 Mo are registered trademarks of AK Steel.

Hastelloy and Haynes are trademarks of Haynes International. Stellite and Tribaloy are trademarks of Deloro Stellite, Inc. Inconel and Monel are trademarks of International Nickel Co. Inc.
Metric Practice
The values shown in this bulletin were established in U.S. customary units. The metric equivalents of U.S. customary units shown may be approximate. Conversion to the metric system, known as the International System of Units (SI), has been accomplished in accordance with the American Iron and Steel Institute Metric Practice Guide, 1978. The Newton (N) has been adopted by the SI as the metric standard unit of force as discussed in the AISI Metric Practice Guide. The term for force per unit of area (stress) is the Newton per square meter (N/m^2). Since this can be a large number, the prefix mega is used to indicate 1,000,000 units and the term meganewton per square meter (MN/m^2) is used. The unit (N/m^2) has been designated a Pascal (Pa).
Galling Resistance
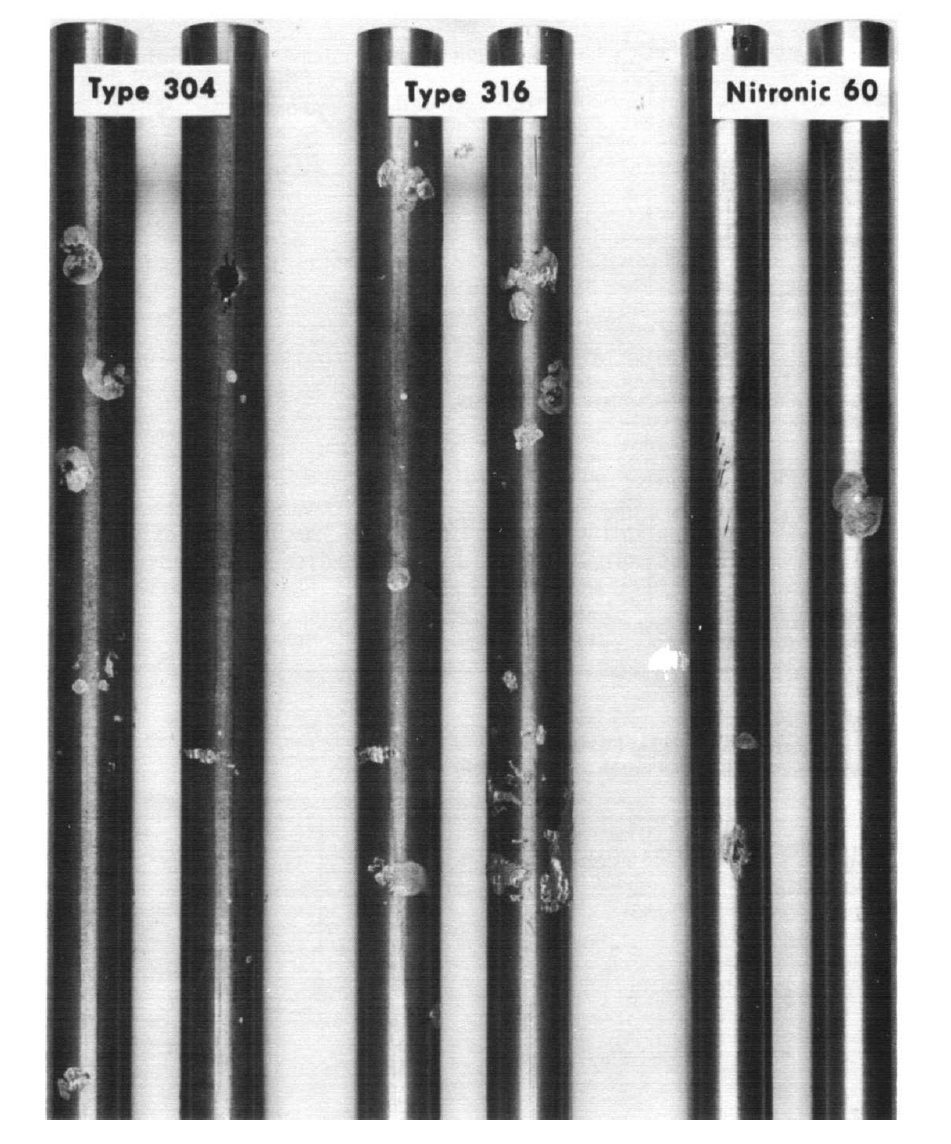
Galling is the tearing of metal surfaces which suddenly renders a component unserviceable. Galling is a major concern in two application areas in particular - threaded assemblies and valve trim. Armco uses a button and block galling test to rank alloys for their galling tendencies. In the test procedure, a deadload weight is applied in a floor model Brinell Hardness Tester on two flat, polished surfaces (10-20 microinches). The 0.5-inch (12.7 mm) diameter bar is slowly rotated by hand 360° under the load and then examined for galling at a 7X magnification. If galling has not occurred, new specimens are tested at higher stresses until galling is observed. The threshold galling stress is selected as the stress midway between the highest nongalled stress and the stress where galling was first observed. Results are reproducible within +/- 2.5 ksi (18 MPa). However, this test should not be used for design purposes because of the many unknown variables in a particular application. The test has proven highly successful as a method of screening alloys for prototype service evaluation. For further details of the test procedure, see April, 1973, Materials Engineering, page 60.
Table 1
Unlubricated Galling Resistance of Stainless Steels
Threshold Galling Stress in ksi (MPa)
(Stress at which galling began)
Conditions & Nominal
Hardness (Brinell)
Type
410
Type
416
Type
430
Type
440C
Type
303
Type
304
Type
316
17-4
PH
NITRONIC 32 NITRONIC 60
Hardened & Stress Relieved
(352) Type 410
3 (21) 4 (28) 3 (21) 3 (21 ) 4 (28) 2 (14) 2 (14) 3 (21) 46 (317) 50 + (345)
Hardened & Stress Relieved
(342) Type 416
4 (28) 13 (90) 3 (21) 21 (145) 9 (62) 24(165) 42(290) 2 (14) 45 (310) 50 + (345)
Annealed (159) Type 430 3 (21 ) 3 (21 ) 2 (14) 2 (14) 2 (14) 2 (14) 2 (14) 3 (21) 8 (55) 36 (248)
Hardened & Stress Relieved
(560) Type 440C
3 (21 ) 21 (145) 2 (14) 11 (76) 5 (34) 3 (21) 37(255) 3 (21) 50 + (345) 50 + (345)
Annealed (153) Type 303 4 (28) 9 (62) 2 (14) 5 (34) 2 (14) 2 (14) 3 (21) 3 (21) 50 + (345) 50 + (345)
Annealed (140) Type 304 2 (14) 24 (165) 2 (14) 3 (21) 2 (14) 2 (14) 2 (14) 2 (14) 30 (207) 50 + (345)
Annealed (150) Type 316 2 (14) 42 (290) 2 (14) 37 (255) 3 (21) 2 (14) 2 (14) 2 (14) 3 (21) 38 (262)
H 950 (415) 17-4 PH 3 (21) 2 (14) 3 (21) 3 (21) 2 (14) 2 (14) 2 (14) 2 (14) 50 + (345) 50 + (345)
Annealed (235)
NITRONIC 32
46(317) 45 (310) 8 (55) 50 +(345) 50 +(345) 30(207) 3 (21) 50 +(345) 30 (207) 50 + (345)
Annealed (205)
NITRONIC 60
50 +(345) 50 +(345) 36 (248) 50 +(345) 50 +(345) 50 +(345) 38(262) 50 +(345) 50 + (345) 50 (345)
+ Did Not Gall
(Note condition and hardness apply to both horixontal and veritcal axes.)
Button at left is Type 316 stainless steel tested against Type 304 at only 3,000 psi (21 MPa). The scoring shown on the Type 316 is the result of metal pickup initiated by galling. Button at right is NITRONIC 60 stainless tested at 44,000 psi (303 MPa) against Type 303.
Table 2
Unlubricated Galling Resistance of Several Metal Combinations
Couple - (Brinell Hardness) Threshold
Galling Stress ksi (MPa)
(Stress at which galling began)
Waukesha 88 (141) vs. Type 303 (180) 50 + (345)
Waukesha 88 (141) vs. Type 201 (202) 50 + (345)
Waukesha 88 (141) vs. Type 316 (200) 50 + (345)
Waukesha 88 (141) vs. 17-4 PH (405) 50 + (345)
Waukesha 88 (141) vs. 20 Cr-80 Ni (180) 50 + (345)
Waukesha 88 (141) vs. Type 304 (207) 50 + (345)
Silicon Bronze (200) vs. Silicon Bronze (200) 4 (28)
A-286 (270) vs. A-286 (270) 3 (21)
NITRONIC 60 (205) vs. A-286 (270) 49 + (338)
NITRONIC 60 (205) vs. 20 Cr-80 Ni (180) 36 (248)
NITRONIC 60 (205) vs. Ti-6AI-4V (332) 50 + (345)
AISI 4337 (484) vs. AISI 4337 (415) 2 (14)
AISI 1034 (415) vs. AISI 1034 (415) 2 (14)
NITRONIC 60 (205) vs. AISI 4337 (448) 50 + (345)
NITRONIC 60 (205) vs. Stellite 6B (415) 50 + (345)
NITRONIC 32 (234) vs. AISI 1034 (205) 2 (14)
NITRONIC 32 (231) vs. Type 201 (202) 50 + (345)
NITRONIC 60 (205) vs. 17-4 PH (322) 50 + (345)
NITRONIC 60 (205) vs. NITRONIC 50 (205) 50 + (345)
NITRONIC 60 (205) vs. PH 13-8 Mo (297) 50 + (345)
NITRONIC 60 (205) vs. PH 13-8 Mo (437) 50 + (345)
NITRONIC 60 (205) vs. 15-5 PH (393) 50 + (345)
NITRONIC 60 (205) vs. 15-5 PH (283) 50 + (345)
NITRONIC 60 (205) vs. 17-7 PH(404) 50 + (345)
NITRONIC 60 (205) vs. NITRONIC 40 (185) 50 + (345)
NITRONIC 60 (205) vs. Type 410 (240) 36 (248)
NITRONIC 60 (205) vs. Type 420 (472) 50 + (345)
NITRONIC 60 (210) vs. Type 201 (202) 46 + (317)
NITRONIC 60 (210) vs. AISI 4130 (234) 34 (234)
NITRONIC 60 (205) vs. Type 301 (169) 50 + (345)
Type 440C (600) vs. Type 420 (472) 3 (21)
Type 201 (202) vs. Type 201 (202) 20 (137)
NITRONIC 60 (205) vs. Cr plated Type 304 50 + (345)
NITRONIC 60 (205) vs. Cr plated 15-5PH (H 1150) 50 + (345)
NITRONIC 60 (205) vs. Inconel 718 (306) 50 + (345)
NITRONIC 60 (205) vs. CP Titanium (185) 47 + (324)
Table 2 Continued
Couple - (Brinell Hardness) Threshold
Galling Stress ksi (MPa)
(Stress at which galling began)
NITRONIC 60 (205) vs. Ni Resist Type 2 (145) 50 + (345)
NITRONIC 60 (205) vs. Stellite 21 (295) 43 + (296)
Type 201 (202) vs. Type 304 (140) 2 (14)
Type 201 (202) vs. 17-4 PH (382) 2 (14)
Type 410 (322) vs. Type 420 (472) 3 (21)
Type 304 (140) vs. AISI 1034 (205) 2 (14)
Type 304 (337) vs. Type 304 (337) 2 (14)
Type 304 (207) vs. Type 304 (337) 2 (14)
Duplex 2205 (235) vs. Type 303 (153) 2 (14)
Duplex 2205 (235) vs. Type 304 (270) 2 (14)
Duplex 2205 (235) vs. Type 316 (150) 2 (14)
Duplex 2205 (235) vs. Type 416 (342) 2 (14)
Duplex 2205 (235) vs. 17-4 PH (415) 2 (14)
Duplex 2205 (235) vs. NITRONIC 60 (210) 30 (207)
IN 625 (215) vs. Type 303 (153) 2 (14)
IN 625 (215) vs. Type 304 (270) 2 (14)
IN 625 (215) vs. Type 316 (161) 2 (14)
IN 625 (215) vs. 17-4 PH (415) 2 (14)
IN 625 (215) vs. NITRONIC 60 (210) 33 (227)
Stellite 21 (270) vs. Type 316 (161) 2 (14)
Stellite 21 (270) vs. NITRONIC 50 (210) 2 (14)
Stellite 21 (270) vs. NITRONIC 60 (210) 43 + (297)
K-500 Monel (321) vs. Type 304 (270) 2 (14)
K-500 Monel (321) vs. Type 316 (161) 2 (14)
K-500 Monel (321) vs.17-4 PH(415) 2 (14)
K-500 Monel (321) vs. NITRONIC 50 (245) 2 (14)
K-500 Monel (321 ) vs. NITRONIC 60 (210) 17 (117)
NITRONIC 60 (210) vs. Tribaloy 700 (437) 45 + (310)
Stellite 68 (450) vs. Type 316 (61) 8 (55)
Stellite 68 (450) vs. Type 304 (150) 47 + (324)
Steliite 68 (450) vs. NITRONIC 60 (210) 50+ (345)
Type 410 (210) vs. Type 410 (210) 2 (14)
Type 410 (363) vs. Type 410 (363) 2 (14)
Type 410 (210) vs. Type 410 (363) 2 (14)
17-4 PH (H 1150 + H 1150) (313) vs. 17-4 PH (H 1150 + H 1150) (313) 2 (14)
Type 410 (210) vs. 17-4 PH (H 1150 + H 1150) (313) 2 (14)
NITRONIC 60 (210) vs. 17-4 PH (H 1150 + H 1150) (313) 21 (145)
NITRONIC 60 (210) vs. Type 410 (210) 24 (165)
+ Did not gall
Table 3
Cryogenic Galling Resistance*
Couple-(Brinell Hardness) Threshold
Galling Stress ksi (MPa)
(Stress at which galling began)
NITRONIC 60 (189) vs. NITRONIC 60 (189) 50 + (345)
NITRONIC 60 (189) vs. Type 410 (400) 50 + (345)
NITRONIC 60 (189) vs. 17-4 PH (415) 50 + (345)
NITRONIC 60 (189) vs. Type 304 (178) 50 + (345)
17-4 PH (404) vs. Type 410 (400) 7 (48)
Type 304 (178) vs. Type 410 (400) 22 (152)
+ Did not gall.
- Tested in liquid nitrogen -320F° ( -196 C).
Elevated Temperature
Galling Applications
NITRONIC 60 Stainless Steel has performed successfully in elevated temperature service for valve trim. Several austenitic stainless steels were evaluated as stems and bushings in an automotive emissions control butterfly valve. However, only NITRONIC 60 operated smoothly over the entire temperature range. The other alloys galled in the 800-1500 F° (427- 816C) temperature range. Another application involved a 20-inch (508 mm) gate valve which opened and closed every 170 seconds at 750 F° (399C). NITRONlC 60 weld overlay on the seat and disk lasted 140 days without galling which would have quickly contaminated the process. A similar valve with Stellite 6B hard faced trim lasted only 90 days.
Wear Resistance
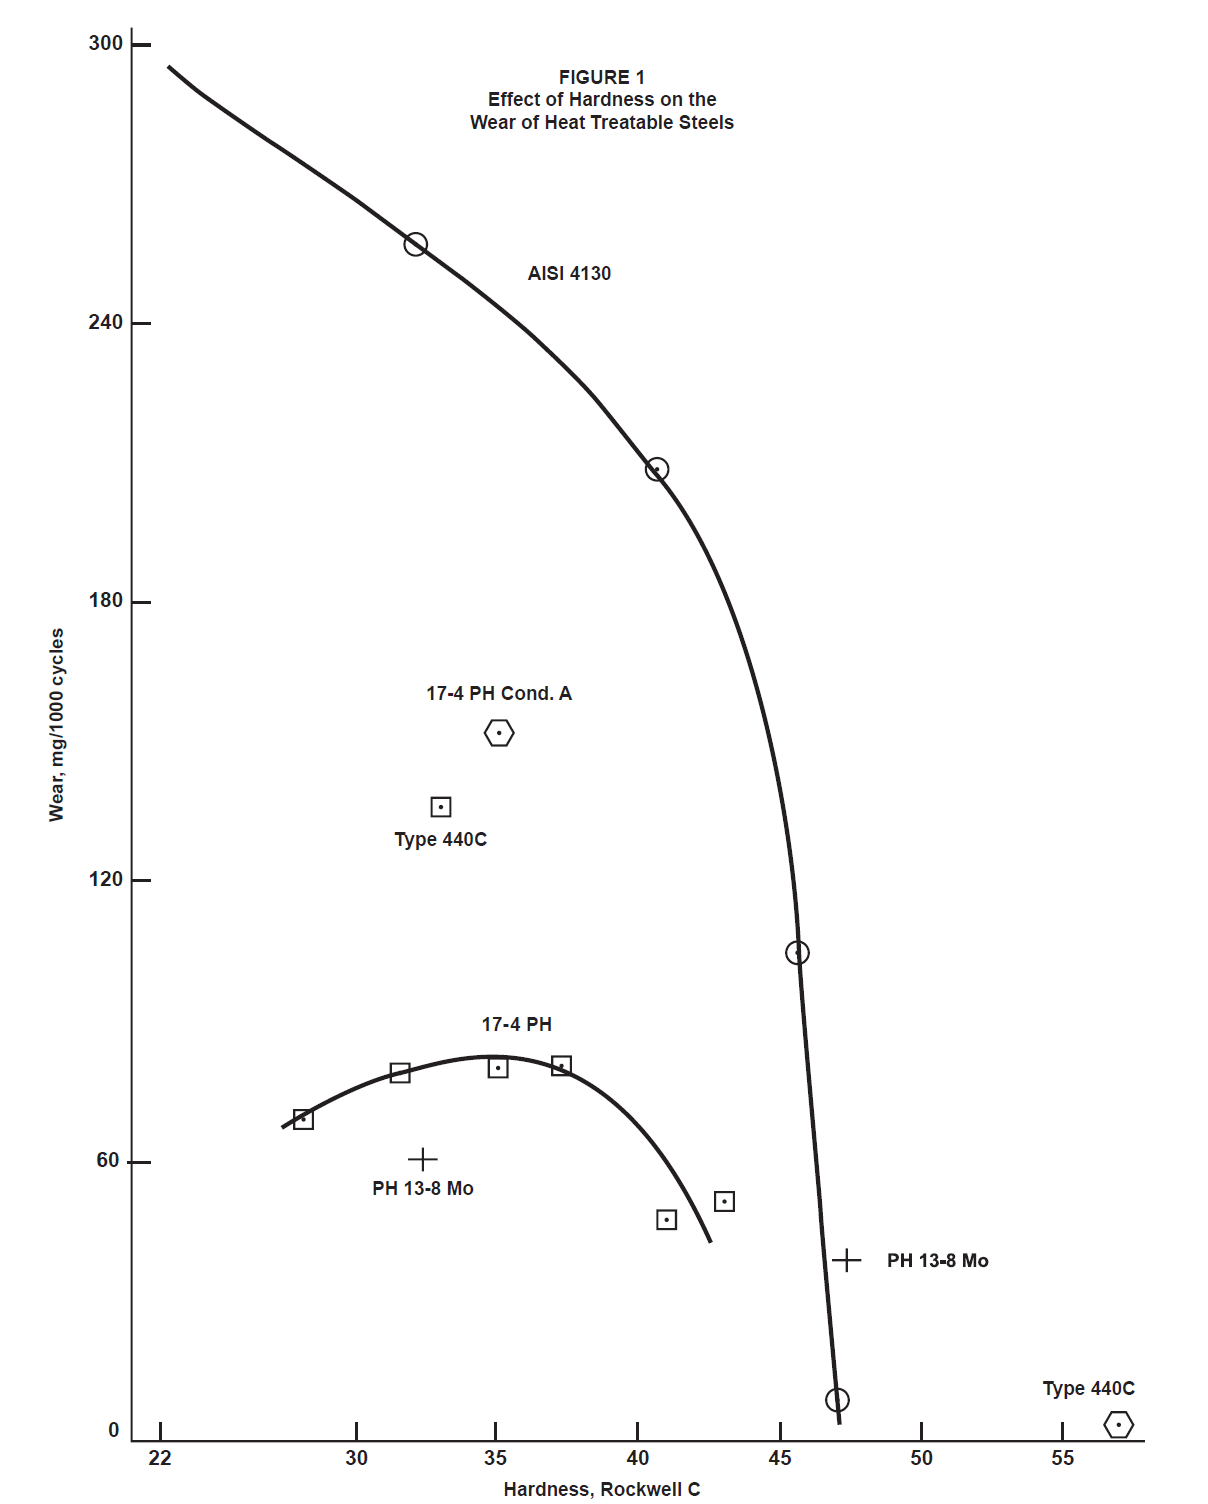
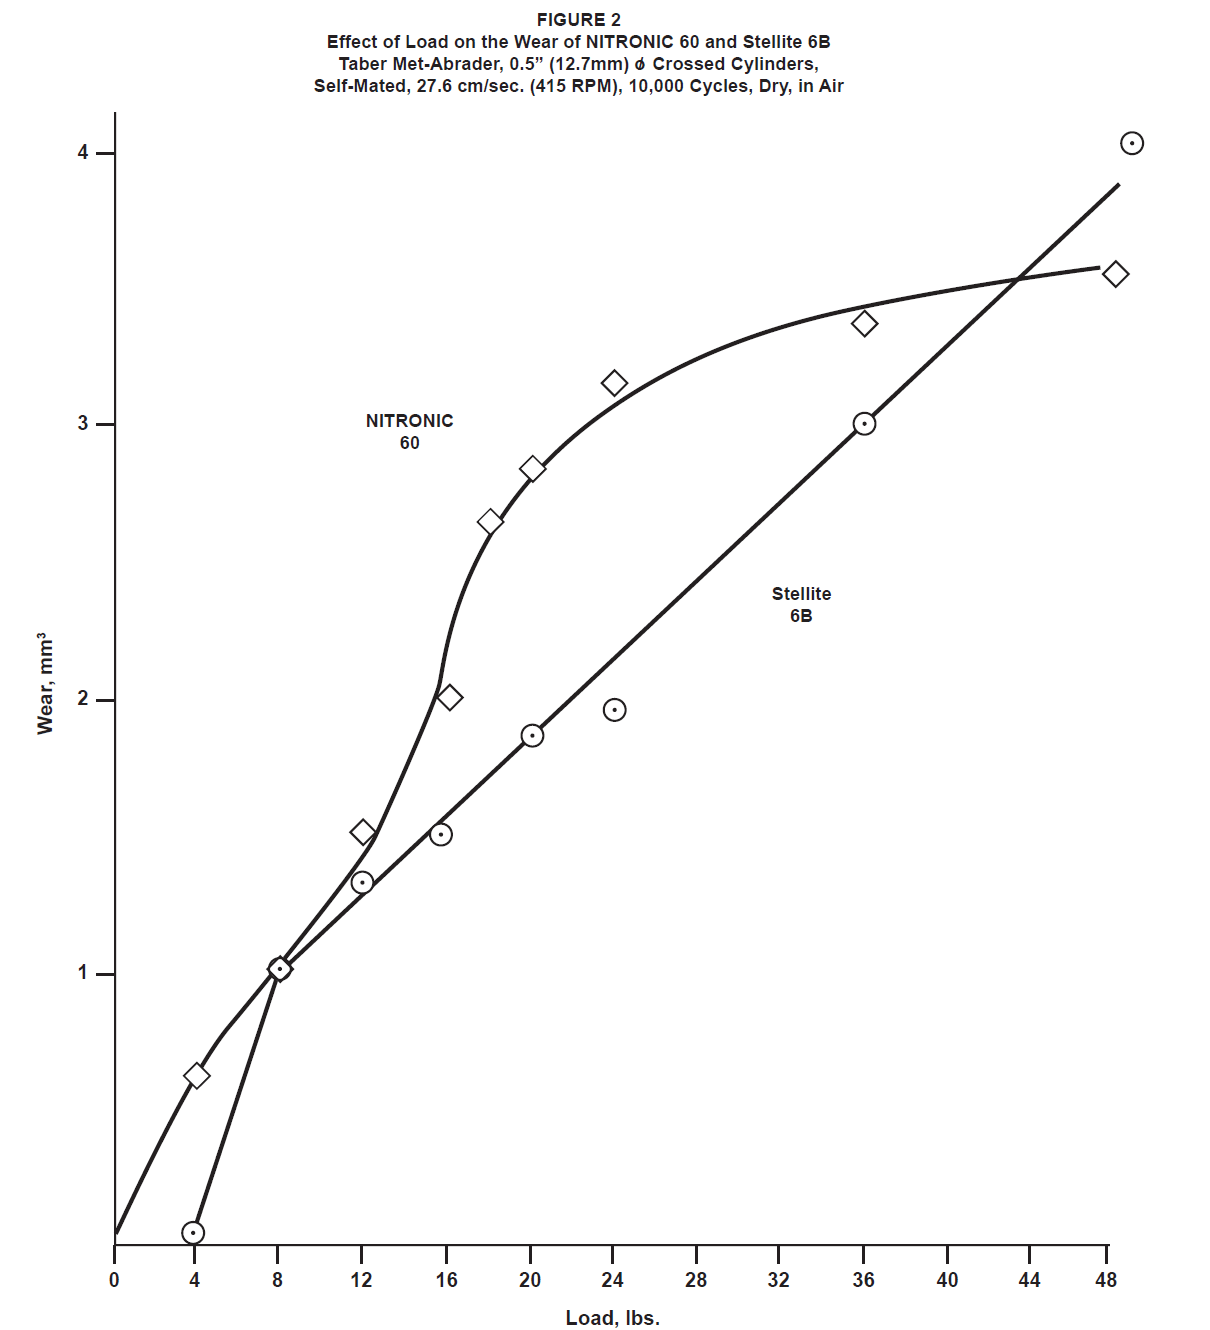
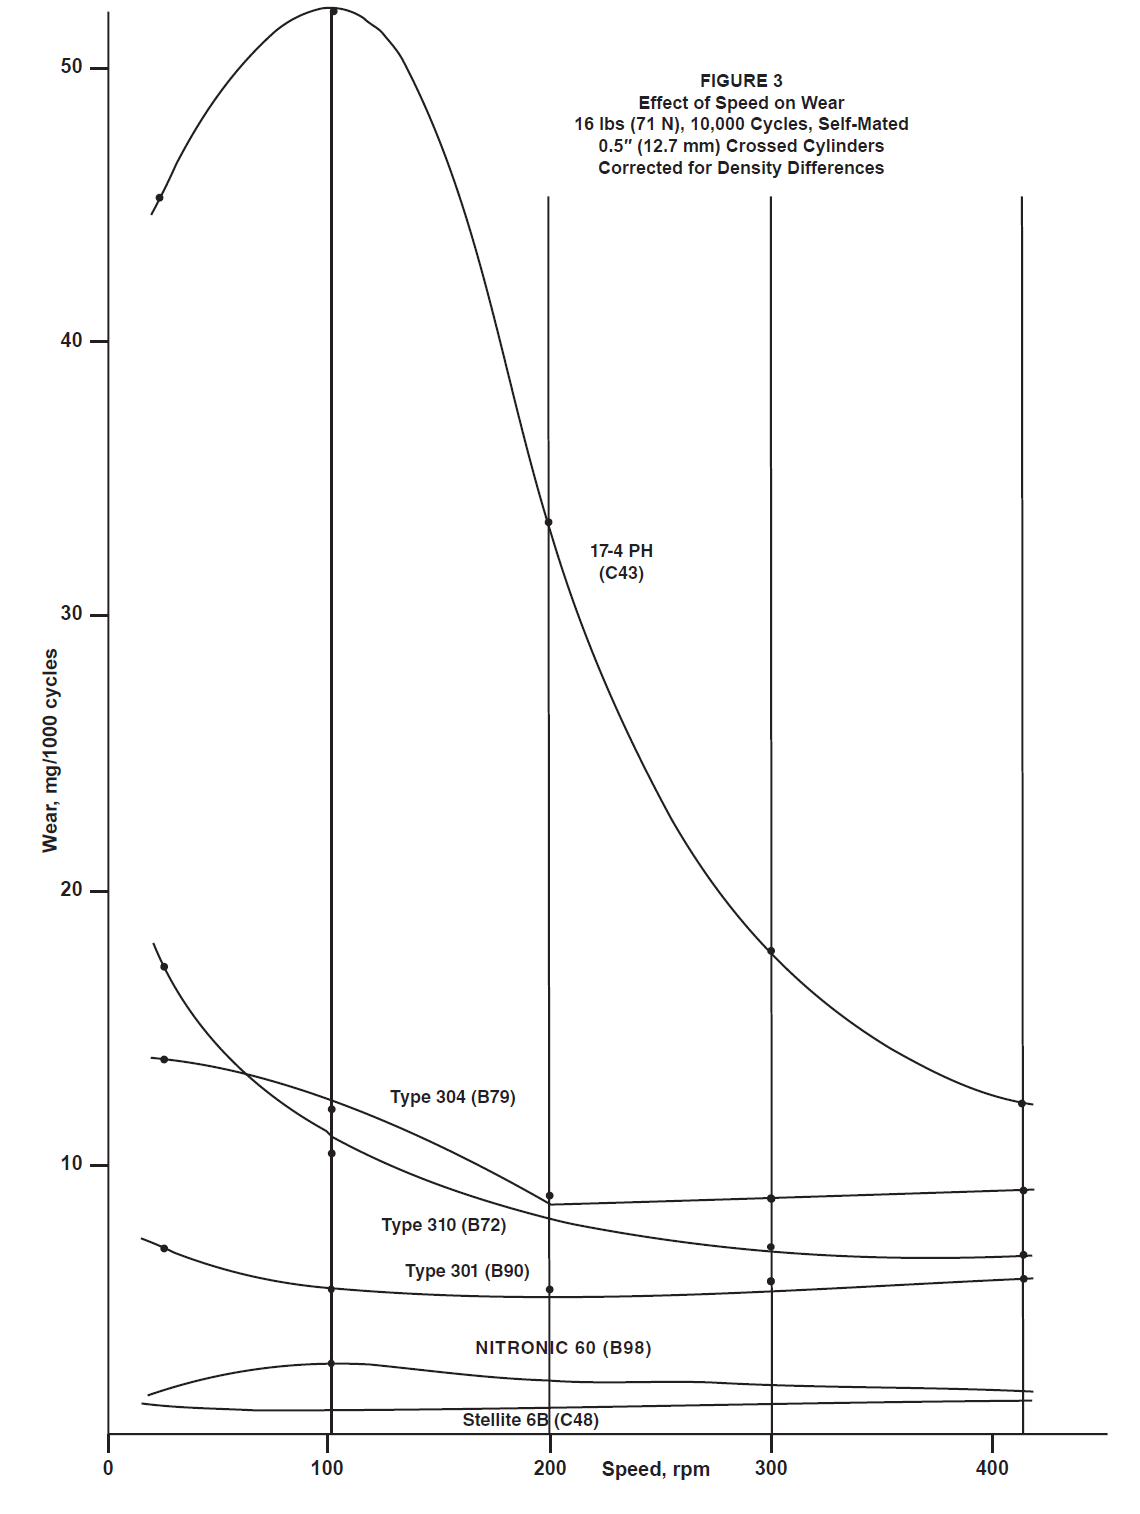
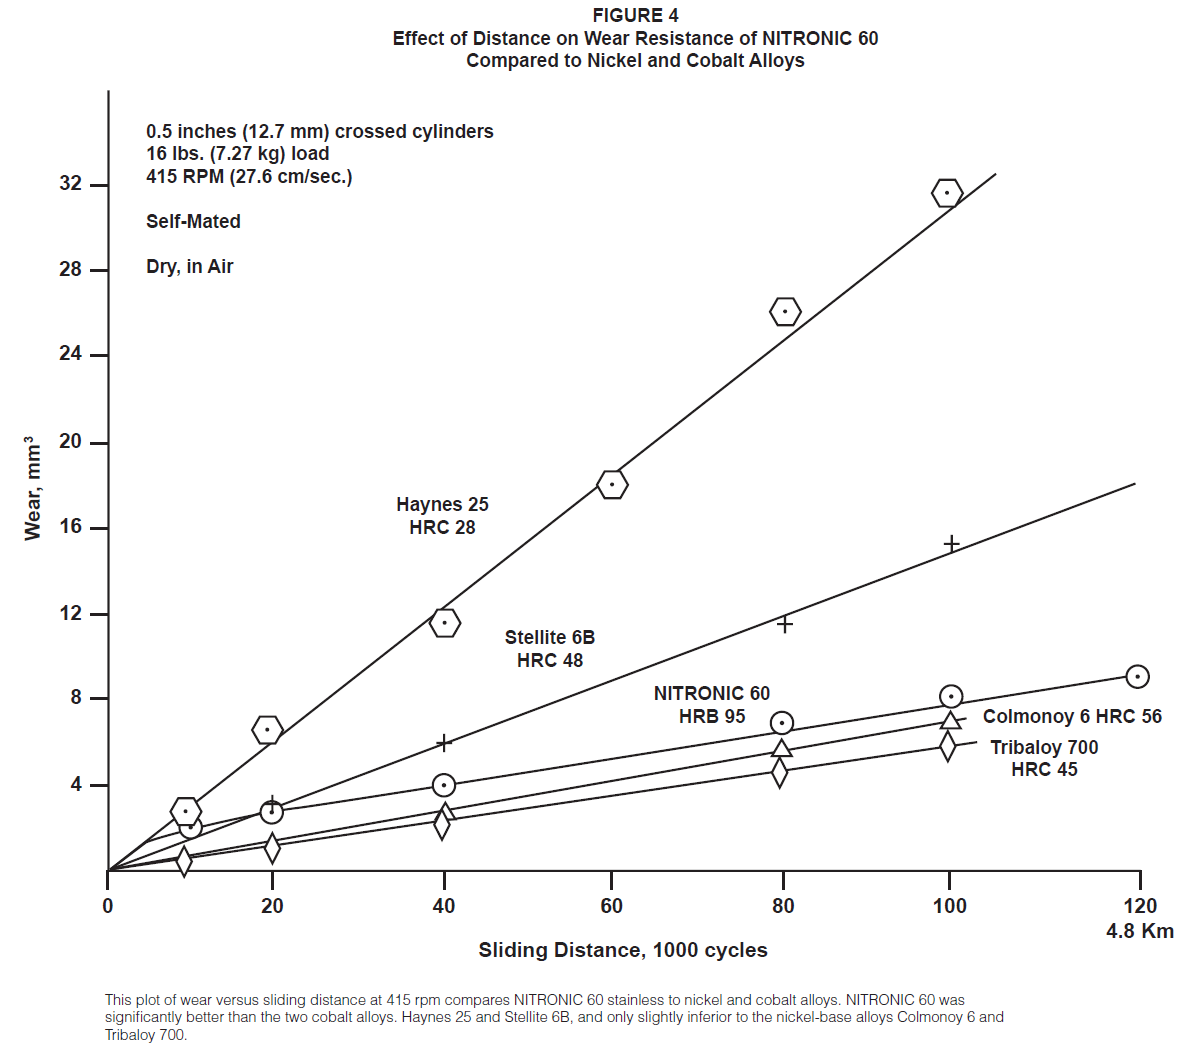
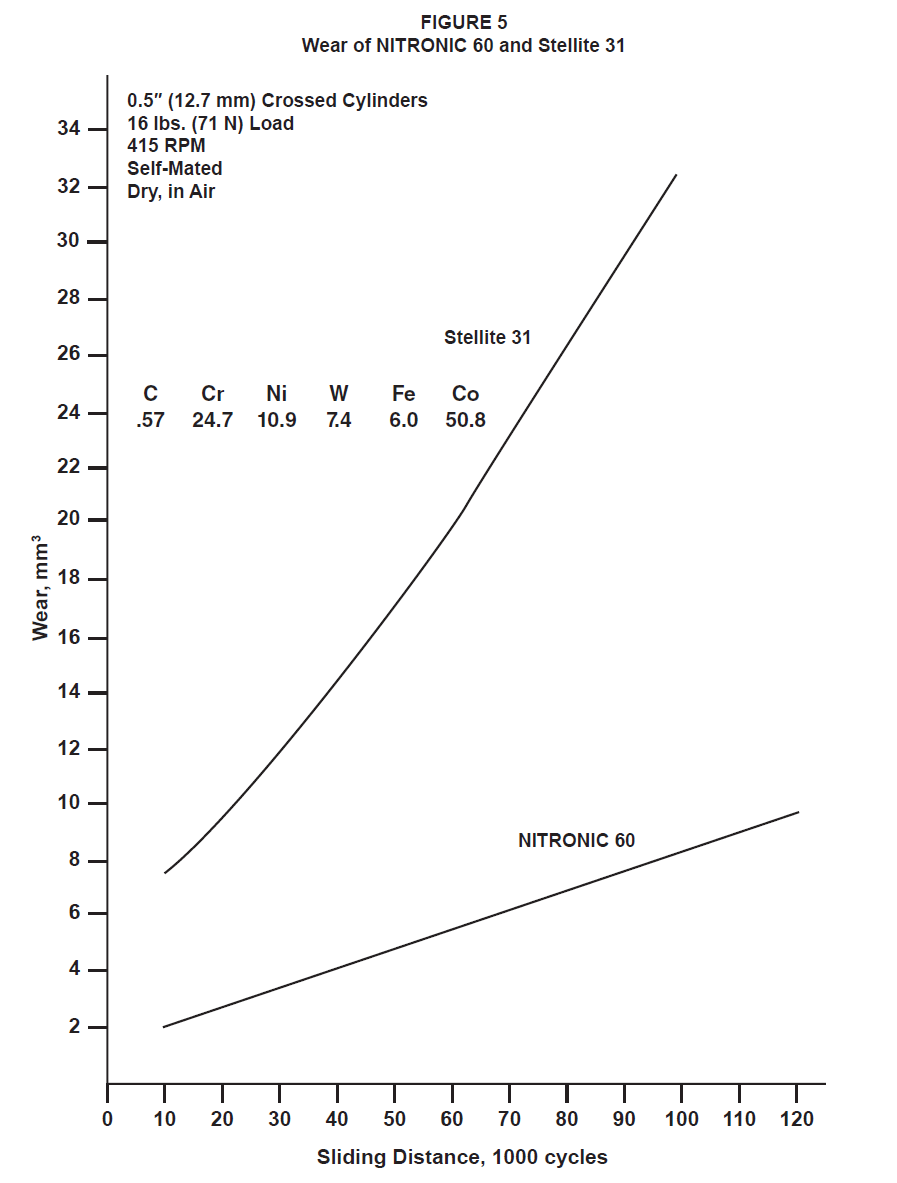
Data shown in Tables 4 through 16 and Figure 1, were developed under the following test conditions: Taber Met-Abrader machine, 0.500-inch (12.7 mm) crossed 90° cylinders, no lubricant, 16-pound (71 N) load, 105 RPM (and 415 RPM where noted), room temperature, 120 grit surface finish, 10,000 cycles, degreased in acetone, duplicate tests, weight loss corrected for density differences.
Taber Met-Abrader crossed cylinder wear test.
Table 4
Wear Compatibility of Self-Mated Austenitic Stainless Steels
Alloy Hardness Rockwell Weight Loss in mg/1,000 cycles
@105 RPM @415 RPM
NITRONIC 60 B95 2.79 1.58
Type 201 B90 4.95 4.68
Type 301 B90 5.47 5.70
Type 302B B90 5.47 4.62
NITRONIC 32 B95 7.39 3.08
NITRONIC 33 B94 7.95 4.35
NITRONIC 40 B93 8.94 5.35
NITRONIC 50 B99 9.95 4.60
Type 310 B72 10.40 6.49
Type 316 B91 12.50 7.32
Type 304 B99 12.77 7.59
Duplex 2205 B99 17.40 4.02
21-4N C33 21.38 10.02
Type 303 B99 386.10 50.47
Table 5
Wear Compatibility of Self-Mated Martensitic and Ferritic Stainless Steels
Alloy Hardness Rockwell Weight Loss in mg/1,000 cycles
@105 RPM @415 RPM
Type 440C C57 3.81 0.54
PH 13-8 Mo C47 38.11 5.41
17-4 PH C43 52.80 12.13
Type 416 C39 58.14 99.78
PH 13-8 Mo C32.5 60.15 10.95
Type 430 (5000 cycles) B94 120.00 69.93
Type 440C C35 153.01 163.35
Type 420 (5000 cycles) C46 169.74 12.73
Type 431 (5000 cycles) C42 181.48 10.35
Type 410 C40 192.79 22.50
Table 6
Wear Compatibility of Self-Mated Cast Alloys and Coatings
Alloy Hardness Rockwell Weight Loss in mg/1,000 cycles
@105 RPM @415 RPM
Ni-Hard C44.5 0.13 0.39
Tufftrided PH C70 0.33 -
White Cast Iron C60 0.38 0.20
Tribaloy 800 C54.5 0.65 0.37
Tribaloy 700 C45 0.93 0.50
Borided AISI 1040 C70 1.01 2.08
Colmonoy 6 C56 1.06 0.58
Stellite 31 C24 1.65 6.04
Chrome Plate -- 1.66 1.28
Nitrided PH -- - 1.11
Ni-Resist Type 1 B80 4.45 508.52
Ni-Resist Type 2 B80 8.80 522.32
Waukesha 88 B81 7.09 6.10
Inconel C25 19.67 2.67
HN B78 21.75 2.94
CA6-NM C26 130.41 55.60
Table 7
Wear Compatibility of Self-Mated Various Wrought Alloys
Alloy Hardness Rockwell Weight Loss in mg/1,000 cycles
@105 RPM @415 RPM
D2 Tool Steel C61 0.46 0.34
AISI 4337 C52 0.73 0.48
Stellite 6B C48 1.00 1.27
Hadfield Mn Steel B95 1.25 0.41
Haynes 25 C28 1.75 23.52
Aluminum Bronze(10.5 AI) B87 2.21 1.52
Be-Cu C40 2.97 2.56
Silicon Bronze B93 5.57 4.18
Ti-6AI-4V C36 7.64 4.49
Inconel 718 C38 9.44 2.85
AISI 4130 C47 9.44 6.80
Waspaloy C36 11.25 3.28
Inconel 625 B96 11.34 3.49
Hastelloy C B95.5 13.88 4.50
20 Cb-3 B99 16.47 7.22
6061-T6 Aluminum B59 17.06 21.15
A-286 C33 17.07 7.62
Inconel X750 C36 18.70 5.56
H 13 Tool Steel C45 20.74 10.15
K-500 Monel C34 30.65 23.87
20 Cr-80 Ni B87 44.91 13.92
Copper B49 57.01 29.25
Leaded Brass B72 127.91 67.12
AISI 1034 B95 134.05* 106.33
Nickel B40 209.72 110.25
Astralloy V C46 213.58 8.22
AISI 4130 C32 257.59 262.64
*5,000 cycles
Table 8
Wear Compatibility of Stainless Steel Couples
Alloy Weight Loss in mg/1,000 cycles
Type 304 Type 316 17.4 PH NITRONIC 32 NITRONIC 50 NITRONIC 60 Type 440C
Hardness Rockwell B99 B91 C43 B95 B99 B95 C57
Type 304 12.8
Type 316 10.5 12.5
17-4 PH 24.7 18.5 52.8
NITRONIC 32 8.4 9.4 17.2 7.4
NITRONIC 50 9.0 9.5 15.7 8.3 10.0
NITRONIC 60 6.0 4.3 5.4 3.2 3.5 2.8
Type 440C 4.1 3.9 11.7 3.1 4.3 2.4 3.8
Table 9
Wear Compatibility of Corrosion-Resistant Couples
Alloy Weight Loss in mg/1,000 cycles
Silicon Bronze Chrome Plate Stellite 6B
Type 304 (B99) 2.1 2.3 3.1
17-4 PH (C43) 2.0 3.3 3.8
NITRONIC 32 (B95) 2.3 2.5 2.0
NITRONIC 60 (B95) 2.2 2.1 1.9
Silicon Bronze 5.6 1.3 1.9
Chrome Plate 1.7 0.33
Stellite 68 1.00
Table 10
Wear Compatibility of NITRONIC 60 Compared with
17-4 PH and Stellite 6B Against Various Alloys
Alloy Hardness Rockwell Weight Loss of Couple (mg/1,000 cycles)
17-4 PH (C43) NITRONIC 60 (B95) Stellite 6B (C48)
Type 304 B99 24.7 6.0 3.1
Type 316 B91 18.5 4.3 5.5
17-4 PH C31.5 66.1 4.9 2.7
17-4 PH C43 52.8 5.4 3.8
NITRONIC 32 B95 17.2 3.2 2.0
NITRONIC 50 B99 15.7 3.5 2.9
NITRONIC 60 B95 5.4 2.8 1.9
Stellite 68 C48 3.8 1.9 1.0
Chrome Plate - 3.3 2.1 0.3
Silicon 8ronze B93 2.0 2.2 1.9
K-500 Monel C34 34.1 22.9 18.8
Type 416 C24 - 5.5 43.0
Type 431 C32 - 3.0 1.0
Waspaloy C36 - 3.1 2.4
Inconel 718 C38 - 3.1 2.7
Inconel X-750 C36 - 5.5 8.0
Table 11
Comparative Sliding Compatibility of
NITRONIC 60 Stainless Steel
and Waukesha 88 in Contact with
Stainless Steels
Alloy Weight Loss in mg/1,000 cycles
vs. NITRONIC 60 vs. Waukesha 88
Hardness Rockwell B95 B81
NITRONIC 60 (B95) 2.79 8.44
Waukesha 88 (B81) 8.44 7.09
Type 304 (B99) 6.00 8.14
Type 316 (B91) 4.29 9.55
Type 440C (C57) 2.36 6.90
17-4 PH (C43) 5.46 9.12
NITRONIC 32 (B95) 3.18 7.57
Table 12
Wear of Type 410 and 17-4 PH in NACE-Approved Conditions for Sour Well Service
Alloy Couple (Rockwell Hardness) Weight Loss in mg/1,000 cycles
@105 RPM @415 RPM
Type 410 (B95) - Self 261.07 115.69
17-4 PH (C34, Condition H 1150 + H 1150) - Self 75.42 26.80
17-4 PH (C34, Condition H 1150 + H 1150) - Type 410 (B95) 104.80 58.94
17-4 PH (C34, Condition H 1150 + H 1150) - NITRONIC 60 (B95) 4.14 4.34
Type 410 (B95) - NITRONIC 60 (B95) 3.81 5.19
Table 13
Wear Compatibility of Miscellaneous Dissimilar Couples
Couple (Rockwell Hardness) Couple Weight Loss
(mg/1,000 cycles)
NITRONIC 60 (B95) vs. Type 431 (C32) 3.01
NITRONIC 60 (B95) vs. Type 431 (C42) 3.01
NITRONIC 60 (B95) vs. Type 416 (C39) 16.5
NITRONIC 60 (B95) vs. 17-4 PH (C31.5) 4.91
NITRONIC 60 (B95) vs. Type 301 (B90) 2.74
NITRONIC 60 (B95) vs. Type 303 (B98) 144.3
NITRONIC 60 (B95) vs. K-500 (C34) 22.9
NITRONIC 60 (B95) vs. A-286 (C33) 5.86
NITRONIC 60 (B95) vs. AISI 4337 (C52) 2.50
NITRONIC 60 (B95) vs. 02 Tool Steel (C61) 1.94
NITRONIC 60 (B95) vs. Ni-Hard (C44.5) 2.19
NITRONIC 60 (B95) vs. Tufftrided PH 2.72
NITRONIC 60 (B95) vs. Borided AISI 1040 2.53
NITRONIC 60 (B95) vs. Tribaloy 700 (C45) 2.08
NITRONIC 60 (B95) vs. Tribaloy 800 (C54.5) 1.34
NITRONIC 60 (B95) vs. Haynes 25 (C28) 2.10
NITRONIC 60 (B95) vs. PH 13-8 Mo (C44) 3.74
NITRONIC 60 (B95) vs. AISI 1040 (B95) 4.09
NITRONIC 60 (B95) vs. Inconel 625 (B99) 3.20
17-4 PH (C43) vs. Type 440C (C34) 113.6
17-4 PH (C43) vs. A-286 (C33) 15.5
17 -4 PH (C43) vs. K-500 (C34) 34.1
17 -4 PH (C43) vs. D2 Tool Steel (C61) 5.69
17-4 PH (C43) vs. Ni-Hard (C44.5) 4.58
17 -4 PH (C43) vs. Haynes 25 (C28) 1.46
17 -4 PH (C43) vs. Ti-6AI-4V (C36) 11.7
17 -4 PH (C43) vs. Borided AISI 1040 11.7
17-4 PH (C43) vs. Inconel 625 (899) 8.84
X 750 (C36) vs. A-286 (C33) 16.7
X 750 (C36) vs. Haynes 25 (C28) 2.10
X 750 (C36) vs. Ti-6AI-4V (C36) 7.85
Type 304 (B99) vs. 02 Tool Steel (C61) 3.33
Type 316 (B91) vs. K-500 (C34) 33.8
NITRONIC 32 (B95) vs. Type 416 (C39) 34.8
NITRONIC 32 (B95) vs. Type 431 (C42) 4.86
NITRONIC 50 (B99) vs. Tufftrided PH 7.01
Type 416 (C39) vs. Be-Cu (C40) 4.12
Type 431 (C32) vs. Stellite 68 (C48) 2.08
Type 431 (C42) vs. Stellite 68 (C48) 0.66
Table 14
Effect of Hardness on the Wear Resistance
of Austenitic Stainless Steels
Self-Mated Series
Weight Loss of Test Couple (mg/1000 cycles)
Type 316L NITRONIC 60 NITRONIC 50
HRB 72 vs. HRB 72 11.58 HRB 92 vs. HRB 92 3.09 HRB 99 vs. HRB 99 9.95
HRB 76 vs. HRB 76 11.86 HRC 29 vs. HRC 29 3.12 HRC 28 vs. HRC 28 9.37
HRC 24 vs. HRC 24 12.54 HRB 92 vs. HRC 29 3.40 HRC 38 vs. HRC 38 9.26
HRC 29 vs. HRC 29 12.51 HRB 99 vs. HRC 38 9.31
HRC 30.5 vs. HRC 30.5 12.52
HRB 72 vs. HRC 30.5 12.06
HRB 76 vs. HRC 29 12.34
Table 15
Effect of Hardness on the Wear Resistance
of Austenitic Stainless Steels
Dissimilar Couple Series
Weight Loss of Test Couple (mg/1000 cycles)
Type 316L NITRONIC 60 NITRONIC 50
HRB 76 vs. Type 304L 11.75 HRB 99 vs. Type 304L 9.00 HRB 92 vs. Type 304L 5.04
HRC 24 vs. Type 304L 11.18 HRC 28 vs. Type 304L 9.24 HRC 29 vs. Type 304L 5.81
HRC 29 vs. Type 304L 10.61 HRC 38 vs. Type 304L 10.08 HRB 92 vs. 17-4 PH 4.11
HRB 76 vs. 17-4 PH 17.95 HRB 99 vs. 17-4 PH 15.69 HRC 29 vs. 17-4 PH 4.29
HRC 24 vs. 17-4 PH 16.22 HRC 28 vs. 17-4 PH 12.56 HRB 92 vs. Stellite 6B 1.87
HRC 29 vs. 17-4 PH 17.46 HRC 38 vs. 17-4 PH 13.25 HRC 29 vs. Stellite 6B 1.98
HRB 72 vs. Stellite 6B 5.77 HRB 99 vs. Stellite 6B 2.25
HRB 76 vs. Stellite 6B 5.55 HRC 28 vs. Stellite 6B 2.94
HRC 24 vs. Stellite 6B 5.53 HRC 38 vs. Stellite 6B 2.33
HRC 29 vs. Stellite 6B 5.74
Table 16
Effect of Surface Finish on the
Wear Resistance of Stainless Steels
Self-Mated Tests
Weight Loss of Couple (mg/1000 cycles)
Emery Drift Surface Finish micro inches (AA) NITRONIC 60 17-4 PH Type 430F*
60 70 2.9 82.0 380
120 21 3.2 81.4 411
240 13 2.7 86.7 403
0 5/6 3.1 84.2 412
3/0 4/5 3.1 83.2 390
electropolished - 2.9 86.0 416
*4000 cycles and triplicate tests
Elevated Temperature Wear

The elevated temperature wear resistance of NITRONIC 60 is excellent despite the alloy's relatively low hardness when compared with cobalt and nickel-base wear alloys. Armco NITRONIC 60 relies on a thin, adherent oxide film and a high strain-hardening capacity to support this film to minimize wear. NITRONIC 60 also performs well in metal-to-metal wear in nominally inert atmospheres.

Table 17
High Temperature Wear Resistance of NITRONIC 60*
Alloy Atmosphere Volume Loss, mm³ Wear Index
NITRONIC 60 Helium 6.94 38.3
NITRONIC 60 Air + Steam** 8.74 30.4
NITRONIC 60 Air + Steam 10.57 25.2
Stellite 6B Air + Steam 28.00 9.5
Type 304 Air + Steam 106.0 2.5
Mild Steel Air + Steam 266.0 1.0 (Base)
* Test Conditions: Self-mated thrust washers, 500F° (260C), 500 rpm, 110 lbs (489 N), 4000 cycles.
Tested at the U.S. Bureau of Mines.
**Preoxidized-1000F° (538C), 3 hours in air.
Test conditions - 16 lbs. load, 20,000 rev., 415 RPM, self-mated, stationary specimen only heated to test temperature.
Fretting Wear

Fretting wear is caused by high loads at very small slip amplitudes (40 µm) such as found in vibrating components. NITRONIC 60 exhibits fretting wear at 1112 F° (600 C) similar to IN 718 which has been found to be one of the most fretting-resistant alloys at this temperature.

Cavitation Erosion
Cavitation erosion resistance of NITRONIC 60 is superior to the austenitic stainless steels as well as high strength duplex (ferritic austenitic) stainless steels. It approaches the cobalt-base alloys which are considered among the most cavitation-resistant alloys available.
NITRONIC 60 Stainless Steel has proven highly successful for wear rings in vertical centrifugal pumps. The combination of NITRONIC 60 and NITRONIC 50 Stainless Steels has replaced cobalt wear alloys in some cases, and offers outstanding wear and corrosion protection. NITRONIC 60 Stainless Steel also has been cast up to 8550 Ibs for water pump impellers where CA-6NM has proven inadequate. It is anticipated that the excellent galling resistance, cavitation erosion resistance, and good castability of NITRONIC 60 Stainless will make it an ideal choice for turbine runners, especially with integrally cast wear rings.
Table 18
Relative Cavitation Erosion Rate
Series 1* NITRONIC 60 1.00 Type 308L 1.89 Al Bronze 3.00 Type 304 3.67 CA-6NM 6.80 AISI 1020 15.44
Series 2* Stellite 6B 0.67 NITRONIC 60 1.00 Duplex 255 3.33 Duplex 2205 4.33 Type 316L Type 317L 5.67
Series 3** NITRONIC 60 1.00 Type 410 1.70 17-4 PH 1.90 Type 316 3.70 CA-6NM 6.60
Series 4 Weld Overlays** Stellite 6B 0.76 NITRONIC 60 1.00 Type 308L 3.38 Type 316 4.62 AI Bronze 12.4
* Laboratory Ultrasonic Cibration Test Method
20kHz, 80F° (27C) H2O, 0.002" (0.05 mm) amplitude.
** High-pressure jet impingement apparatus. All reported tests were conducted by either pump manufacturers or hydroelectric equipment end users.
Table 19
Abrasion Resistance of Corrosion-Resistant Alloys Mated With Al2O3**
Alloy Hardness Rockwell Alloy Wear: mm³ Al2O3 Wear, mm³ Total,mm³
Speed - 105 rpm
Tribaloy 700 C45 0.92 NIL 0.92
Colmonoy 6 C56 1.10 0.05 1.15
Stellite 6B C48 1.63 0.18 1.81
Type 440C C56 2.10 0.30 2.40
NITRONIC 60 B95 3.54 0.58 4.12
Type 301 B90 4.66 0.83 5.49
NITRONIC 50 C33 4.49 1.53 6.02
NITRONIC 32 B94 5.76 1.40 7.16
Type 304 B79 6.76 1.68 8.44
Type 310 B72 8.84 2.85 11.69
17-4 PH C43 24.13 3.63 27.76
Speed - 415 rpm
Type 440C C56 0.73 0.15 0.88
Colmonoy 6 C56 0.84 0.10 0.94
NITRONIC 60 B95 0.98 0.28 1.26
17-4 PH C43 1.80 0.33 2.13
Stellite 6B C48 2.10 0.03 2.13
NITRONIC 60* B95 2.68 0.04 2.72
Type 304 B79 5.06 1.68 6.74
Stellite 6B* C48 8.46 NIL 8.46
*40,000 cycles
** Test Conditions: Taber Met-Abrader machine, 0.5" (12.7 mm) diameter specimen mated with 0.25" (6.4 mm) flat Al2O3 in fixed position, 16 lbs. (71 N), room temperature, 10,000 cycles, dry, and in air.
Table 20
Abrasion Resistance of Corrosion-Resistant Alloys
Mated With Tungsten Carbide*
Alloy Hardness Rockwell Alloy Wear in mm³
10,000 cycles @105 RPM 40,000 cycles @415 RPM
D2 Tool Steel C61 0.09 0.35
Ni-Hard C45 0.19 0.32
Hadfield Mn B95 0.67 0.96
Colmonoy 6 C56 1.08 3.12
Bonde C75 1.16 2.88
Stellite 6B C48 1.35 4.94
Tribaloy 700 C45 1.43 3.90
Type 440C C56 1.50 1.51
Al Bronze B93 1.65 5.89
Haynes 25 C28 2.00 15.39
NITRONIC 60 B95 2.82 9.04
AI Bronze B97 3.17 8.39
Type 301 B90 3.80 16.03
NITRONIC 32 B94 4.20 17.39
Type 304 B79 6.18 52.80
Type 316 B74 7.70 34.06
NITRONIC 50 B99 8.72 30.18
Type 431 C42 9.84 6.16
17-4 PH C43 9.92 22.37
A-286 C33 13.92 36.68
Type 310 B72 15.26 39.09
Type 416 C39 59.63 285.61
X750 C36 - 51.60
*Test Conditions: Taber Met-Abrader machine 0.5" (12.7 mm) diameter crossed cylinders, 16 lbs (71 N), room temperature duplicates, WC in fixed position, dry, and in air.
**Wear to WC was almost nil in all cases and was not monitored.
Table 21
Abrasion Resistance of Corrosion-Resistant Alloys
Mated With Tungsten Carbide*
Alloy Hardness Rockwell Alloy Wear in mm³ - 10,000 cycles
@105 RPM @415 RPM
Type 440C C56 1.21 0.32
Colmonoy 6 C56 2.91 2.17
Stellite 6B C41 3.46 3.45
AI Bronze B87 7.00 5.19
NITRONIC 32 B94 7.08 6.75
NITRONIC 60 B95 7.26 5.42
DUPLEX 2205 - 19.02 6.13
NITRONIC 50 B99 21.45 9.03
Type 316 B76 22.41 15.59
Type 304 B79 25.23 13.48
Hastelloy C B96 33.52 15.01
Type 310 B72 37.24 18.12
20 Cb-3 B99 44.82 17.51
INCONEL 600 B90 55.60 29.93
CA 6-NM C26 66.04 118.72
17-4 PH C43 104.22 37.94
*Only wear to the rotating alloy was measured.
Corrosion Resistance

The general corrosion resistance of NITRONIC 60 Stainless Steel falls between that of Types 304 and 316. However, experience shows that in a wear system, a galling or seizure failure occurs first, followed by dimensional loss due to wear, and finally corrosion. Galling and wear must be the first concerns of the design engineer. Although the general corrosion resistance of NITRONIC 60 is not quite as good as Type 316, it does offer better chloride pitting resistance, stress corrosion cracking resistance, and crevice corrosion resistance than Type 316 in laboratory conditions. Corrosion tests are not normally performed on NITRONIC 60 HS.


Table 22
Corrosion Properties*
Media Annealed
NITRONIC 60
Annealed
Type 304
Annealed
Type 316
17-4 PH
(H 925)
65% Boiling HNO3 0.060 0.012 0.012 0.132
1% HCl @ 35 C 0.010 0.053 - 0.024
2% H2SO4 @ 80 C 0.045 0.243 0.011 0.021
5% H2SO4 @ 80 C 0.521 1.300 0.060 -
5% Formic Acid @ 80 C C <.001 0.081 <.001 0.001
33% Boiling Acetic Acid 0.011 0.151 <.001 0.006
70% Hydrazine 168 F° (76 C), 72 hours No Reaction - Passed
5% Salt Spray @ 95 F° (35 C), 120 hours NITRONIC 60 exhibited resistance to general rusting comparable to Type 304
Table 23
Chloride Pitting Resistance*
Media Annealed
NITRONIC 60
Annealed
Type 304
Annealed
Type 316
17-4 PH
(H 925)
10% FeCl3 @ RT
(pitting test) 50 hours
0.004 gm/in²
No Pits
0.065 gm/in²
No Pits
0.011 gm/in²
Pitted
0.154 gm/in²
Pitted
10% FeCl3 @ RT with artificial
crevices 50 hours
0.024 gm/in²
Slight
0.278 gm/in²
Heavy
0.186 gm/in²
Heavy
-
*Data based on duplicate tests of three different heats, tested in acidified 10% FeCl3 solution.
Table 24
Stress Corrosion Cracking Resistance
(Boiling 42% MgCI2 - 4 notch tension specimens)
Alloy Hours to Failure at Various Stress Levels
20 ksi (138 MPa) 25 ksi (172 MPa) 30 ksi (207 MPa) 35 ksi (241 MPa) 40 ksi (276 MPa)
NITRONIC 60(Number of Tests) 192(8) 32.6(8) 47(2) 2.8(1) 1.8(6)
Type 304(Multiple Tests) 2.3 1.9 1.5 1.2 1.0
Type 316 8 7 6 4.5 4
Seawater Corrosion Resistance
When exposed for 6 months in quiet seawater at ambient temperature, NITRONIC 60 stainless exhibited far better crevice corrosion resistance than Type 304 and slightly better resistance than Type 316 stainless steels. These tests were run on duplicate specimens and all grades were exposed simultaneously.

Table 25
Sulfide Stress Cracking Resistance*
17-4 PH (H 1150-M) NITRONIC 60 (Annealed)
0.2% YS
ksi (MPa)
Stress Applied
Expressed as a % YS
Time to
Failure Hours
0.2% YS
ksi (MPa)
Stress Applied
Expressed as a % YS
Time to
Failure Hours
108.7 (749) 90.6 8.9 55.3 (381) 110 720(No Failure)
108.7 (749) 85.0 19.5 58.7 (405) 110 720(NF)
108.7 (749) 81.6 21.9 52.8 (365) 100 720(NF)
108.7 (749) 72.8 26.7 54.3 (374) 100 720(NF)
108.7 (749) 60.7 50.1 55.3 (385) 100 720(NF)
108.7 (749) 44.9 104.5 58.7 (405) 100 720(NF)
110.5 (762) 34.6 214.6 58.7 (405) 85 720(NF)
110.5 (762) 28.0 572.1 Passed NACE requirements of 720 hours stressed at
100% of 0.2% YS without failure.
110.5 (762) 22.0 720 (No Failure)
Table 26
Sulfidation Resistance*
Test Temperature, F° (C) Weight Loss in mg/in²
NITRONIC 60 Type 309
1600(871) 1.40 1.35
1700(927) 2.14 3745
1800(982) 3040 Dissolved
*Conditions: Duplicate wire specimens placed in mixture of 90% NaSO4 10% KCl for 1 hour at each temperature.
Carburization Resistance
NITRONIC 60 stainless retained the best combination of strength and ductility after exposure compared to Types 316L and 309 as shown in Table 27.
Table 27
Carburization Resistance*
Alloy UTS ksi (MPa) 0.2% YS ksi (MPa) Elongation % in 4XD Reduction of Area % Bend 1.5T
NITRONIC 60 Unexposed 116.0 (800) 49.5 (341) 74.0 66.3 180°
Exposed 91.5 (630) 58.0 (400) 19.0 21.6 100°
Type 316L Unexposed 76.0 (524) 30.0 (207) 68.0 24.4 180°
Exposed 65.0 (448) 36.0 (248) 24.0 21.3 110°
Type 309 Unexposed 99.0 (683) 41.0 (283) 54.0 64.7 180°
Exposed 85.5 (589) 45.5 (313) 14.0 11.9 75°
*Conditions: Duplicate tests exposed at 1800 F° (982 C) for 2 hours in packed 90% graphite - 10% sodium carbonate.

Oxidation Resistance
NITRONIC 60 offers far superior oxidation resistance compared to AISI Types 304 and 316, and about the same oxidation resistance as AISI Type 309.
Table 28
Static Oxidation Resistance*
Test Temperature, F° (C) Weight Loss in mg/cm²
RA 333 Type 310 NITRONIC 60 Type 304
2100 (1149) Before Descaling 3.1 4.6 16.5 1220
After Descaling 12.2 15.7 23.2 1284
2200 (1204) Before Descaling 10.1 10.1 26.1 2260
After Descaling 16.7 20.6 35.4 2265
*240 hours at temperature, duplicate tests.
Table 29
Cyclic Oxidation Resistance
Cycle Alloy Weight Change in mg/cm²
134 cycles 275 cycles 467 cycles 200 cycles 304 cycles 400 cycles
1600-1700 F (871-927 C) RA 330 + 3.4 + 4.9 + 6.4 - - -
25 minutes heat Type 310 + 4.0 + 6.7 22.7 - - -
5 minutes cool Type 309 + 3.0 41.6 100.4 - - -
duplicate tests NITRONIC 60 + 1.5 69.2 167.6 - - -
Weight Loss in mg/cm²
1900 F (1038 C) Type 446 - - - 1.47 1.72 1.97
30 minutes heat Type 310 - - - 2.70 15.95 17.22
30 minutes cool Type 309 - - - 22.53 26.34 33.69
NITRONIC 60 - - - 42.99 60.40 74.80
Type 316 - - - 93.04 135.34 178.27
Mechanical Properties
Table 30
Typical Room Temperature Tensile Properties* (See Table 36 for acceptable specification values.)
Condition Size Hardness UTS ksi (MPa) 0.2% YS ksi (MPa) Elongation % in 4XD Reduction of Area, %
Annealed 1" (25.4 mm) ∅ 95 HRB 103 (710) 60 (414) 64 74
Annealed 1-3/4" (44.4 mm) ∅ 100 HRB 101 (696) 56 (386) 62 73
Annealed 2-1/4" (57.2 mm) ∅ 100 HRB 101 (696) 60 (414) 60 76
Annealed 3" (76.2 mm) ∅ 97 HRB 113 (779) 65 (448) 55 67
Annealed 4-1/8" (104.8 mm) ∅ 95 HRB 106 (731) 56 (386) 57 67
AMS 5848 95 min. 50 min. 1/2" over ∅
AMS 5898 100 min. 55 min. under 1/2" ∅
*Data based on duplicate tests
(1) CG bar
Table 31
Typical Bearing Properties
ASTM E 238
Condition Bearing Strength ksi (MPa) Bearing Yield Strength ksi (MPa) 0.2% YS ksi (MPa) UTS ksi (MPa) % El in 2" Hardness (R)
Annealed 190.5 (1313) 79.5 (548) 104.9 (723) 52.2 (360) 49.2 B90
10% Cold Rolled 212 (1462) 132.8 (916) 123.1 (849) 90.6 (625) 40.0 C26
HPAlloys
Material
Capabilities
High Strength Nitronic 60
Issued December
22nd , 2003
Strain Hardened Levels
High Strength Nitronic 60
Minimum Specification Levels for Bar
Strength Condition UTS (KSI) Min. YS (0.2%OS) (KSI) Min, Elongation in 4xd (%) Min. Reduction of area (%) Min. Hardness Max Sizes (Inclusive)
Level 1 110 90 35 55 -- 0.25" to 4" Dia
Level 2 135 105 20 50 330 BHN 0.25" to 4" Dia
Level 3 160 130 15 45 -- 0.25" to 2.4" Dia
Level 4 180 145 12 45 -- 0.25" to 2" Dia
Level 5 200 180 10 45 -- 0.25" to 1.5" Dia

Copyright 2004 High Perfomance Alloys, Inc.

All rights reserved. No part of this publication may be reproduced, stored in a retrieval system or transmitted, in any form or by any means: electronic, mechanical, photocopying, recording, or otherwise, without the prior written permission of HPAlloy.

Questions & Comments: Tel: 800-472-5569 (inside USA and Canada)
Tel: 765-945-8230 (outside USA)
Fax: 765-945-8294
Email: service@hpalloy.com
HPAlloy WEB ADDRESS: http://www.hpalloy.com
Table 32
Typical Room Temperature Torsion and Shear Properties*
Condition Diameter Size Torsional Modulus, G ksi (MPa) 0.2% Torsional YS ksi (MPa) Modulus of Rupture ksi (MPa) Double Shear Strength ksi (MPa)
Annealed 1" (25.4 mm) 95 8.83 x 10³
(61 x103)
50.7 (350)
124 (855) -
Annealed 3/8" (9.6 mm) 95 - - - 86 (593)
Table 33
Double Shear Strength*
(Cold Drawn: -0.442" [11.23 mm] start size)
% Cold Drawn Shear Strength, ksi (MPa)
10 89 (614)
20 98 (676)
30 106 (731)
40 113 (779)
50 122 (841)
60 130 (896)
*Data based on duplicate tests
Table 34
Fatigue Strength
(R.R. Moore Machine)
Condition Diameter Size Hardness Fatigue Limit,
ksi (MPa) 10&sup8 Cycles
Annealed 1" (25.4 mm) ∅ 95 HRB 37.5 (258)
Cold Worked 54.6% 0.70" (17.8mm) ∅ 44 HRC 72.5 (500)
Table 35
Room Temperature Compression Strength
Condition Diameter Size 0.2% Compressive YS ksi (MPa)
Annealed 0.500"∅ (12.7 mm) 67.6 (466)
Cold Worked 39% 0.400"∅ (11.2 mm) 121.0 (834)
Table 36
Properties Acceptable for Material Specification (Bar and Wire)
Condition Diameter Size UTS ksi (MPa) 0.2% YS ksi (MPa) Elongation % in 4XD Reduction of Area, % Hardness HRB
Annealed 1/2"∅ + under (12.7 mm) 105 min (724) 55 min (379) 35 min 55 min 85 min
Annealed 1/2"∅ + under (12.7 mm) 95 min (655) 50 min (345) 35 min 55 min 85 min
Table 37
Typical Elevated Temperature Mechanical Properties*
(Annealed 3/4" and 1" [19.05 and 25.4 mm] Diameter Bar Stock)
Test Temperature F(C) UTS ksi (MPa) 0.2% YS ksi (MPa) Elongation % in 4XD Reduction of Area % Hardness Brinell
Room Temperature 106.5 (734) 56.5 (389) 61.7 71.9 200
200 (93) 98.2 (677) 44.4 (306) 63.3 72.4 187
300 (149) 89.9 (620) 37.8 (260) 64.4 73.7 -
400 (204) 84.4 (580) 32.8 (227) 64.0 73.7 168
500 (260) 82.1 (566) 32.1 (222) 61.5 73.0 -
600 (316) 80.5 (555) 29.7 (205) 59.6 73.1 155
700 (371) 79.5 (548) 29.2 (201) 59.1 72.6 -
800 (427) 78.3 (540) 29.0 (200) 56.5 72.1 148
900 (482) 77.1 (532) 28.3 (195) 53.9 71.6 -
1000 (538) 75.4 (520) 28.0 (193) 52.2 70.4 145
1100 (593) 71.6 (494) 28.7 (198) 48.7 70.0 -
1200 (649) 66.6 (459) 28.1 (194) 48.2 69.6 144
1300 (704) 59.0 (407) 27.5 (189) 41.4 50.0 -
1400 (760) 49.8** (344) 25.3 (174) 47.1 53.9 143
1500 (816) 37.0** (255) 23.8 (164) 72.8 75.0 -
1600 (871) 30.2** (208) 16.4 (113) 72.8 - 110
*Triplicate test of 2 heats and Single tests of 1 heat
**Single tests of 1 heat
Table 38
Elevated Temperature Tensile Properties
(Cold Swaged 54% to 0.700" [17.8 mm] ∅)
Test Temperature F (C) UTS ksi (MPa) 0.2% YS ksi (MPa) Elongation % in 4XD Reduction of Area %
Room Temperature 230 (1586) 216 (1489) 55 12
200 (93) 215 (1482) 205 (1413) 54 12
300 (149) 206 (1420) 199 (1372) 52 11
400 (204) 200 (1379) 194 (1338) 51 11
500 (260) 195 (1344) 191 (1317) 48 11
600 (316) 193 (1331) 188 (1296) 47 11
700 (371) 191 (1317) 176 (1213) 47 10
800 (427) 190 (1310) 184 (1269) 46 9
900 (482) 187 (1289) 177 (1220) 44 11
1000 (538) 179 (1234) 166 (1145) 47 11
1100 (593) 162 (1117) 144 (993) 52 13
1200 (649) 112 (772) 72 (496) 25 11
Table 39
Elevated Temperature Stress Rupture Strength
(Annealed Bars 5/8" to 1" [16.0 to 25.4 mm] Diameter)
Stress Rupture Strength, ksi (MPa)
Test Temperature F° (C) Number of Heats 100 hr. life 1,000 hr. life 10,000 hr. life
1000 (538) 3 72 (496) 52 (359) 35 (241)
1100 (593) 3 49 (338) 31 (214) 20 (138)
1200 (649) 4 29 (200) 17 (117) 10* (69)
1350 (732) 1 14 (97) 8 (55) -
1500 (816) 1 6.7 (46) 4 (28) -
*Extrapolated
Table 40
Cryogenic Tensile Properties*
Condition Size Temperature, F° (C) UTS ksi (MPa) 0.2% YS ksi (MPa) Elongation % in 4XD Reduction of Area %
Annealed 3/8" (9.5 mm)∅ -100 (-73) 155 (1069) 76 (524) 57 69
3/8" (9.5 mm)∅ -200 (-129) 170 (1172) 87 (600) 56 71
1" (25.4 mm)∅ -320 (-196) 213 (1469) 109 (752) 60 67
Cold Swaged 700" (178 mm)∅ -320 (-196) 322 (2220) 272 (1875) 10 53
54% 700" (178 mm)∅ -200 (-129) 287 (1979) 250 (1724) 13 62
*Duplicate tests
Table 41
Low Temperature Mechanical Properties of
NITRONIC 60 Stainless Steel Longitudinal Tensile Specimens*
Test Temperature, F° (C) UTS ksi (MPa) 0.2% Offset YS ksi (MPa) Elongation % in 1" (25.4 mm) or 4XD Reduction of Area % Fracture Strength ksi (MPa) Modules psi (MPa) N/U** Tensile Ratio Charpy V-Notch Impact ft-lbs (J)
75 ( -73) 109.3 (754) 58.1 (400) 66.4 79.0 336.1 (2317) 24.0 x 10⁶ (165.000) 1.44 231 (310)
0 (-129) 128.1 (883) 67.3 (464) 71.3 79.7 433.4 (2988) 23.7 x 10⁶ (163.000) 1.37 216 (292)
-100 (-196) 148.4 (1023) 77.9 (537) 70.5 80.9 447.1 (3083) 24.2 x 10⁶ (167.000) 1.45 197 (267)
-200 (-196) 167.6 (1155) 167.6 (1155) 62.4 78.4 457.0 (3551) 24.2 x 10⁶ (167.000) 1.46 170 (231)
-320 (-129) 217.9 (1502) 101.4 (699) 59.5 65.8 594.0 (4095) 24.8 x 10⁶ (171.000) 1.26 138 (188)
-423 (-253) 203.8 (1405) 203.8 (1405) 23.5 26.6 277.6 (1914) 24.8 x 10⁶ (171.000) 1.33
*0.0250" (6.35 mm) diameter. Machined from a 1" (254 mm) diameter annealed and straightened bar. Four specimen average.
** Average Stress Concentration Factor Kt -- 7.0
Data taken with permission from NASA TM X-73359. Jan. 1977.
Table 42
Impact Properties**
Condition Size Test Temperature, F (C) Charpy V-Notch Impact, ft-lbs (J)
Annealed 1"∅ (25.4 mm) Room Temperature
-100 (-73)
-320 (-196)
240* (325)
229 (310)
144 (195)
Annealed 2-1/4"∅ (54.2 mm) Room Temperature
-100 (-73)
-320 (-196)
240* (325)
240* (310)
160 (195)
Cold Swaged 18%
Hardness RC 29
.932"∅ (23.7 mm) -320 (-196) 67 (91)
Cold Swaged 40%
Hardness RC 37
.795"∅ (20.2 mm) -320 (-196) 40 (91)
Cold Swaged 54%
Hardness RC 42
.700"∅ (17.8 mm) -320 (-196) 26 (35)
Cold Swaged 18%
Hardness RC 29
.932"∅ (23.7 mm) -200 (-129) 67 (91)
Cold Swaged 40%
Hardness RC 37
.795"∅ (20.2 mm) -200 (-129) 67 (91)
Cold Swaged 54%
Hardness RC 42
.700"∅ (17.8 mm) -200 (-129) 67 (91)
*Did not fracture completely
**Data based on duplicate tests

High Strength (HS) Bar Properties

NITRONIC 60 Stainless Steel Bars are also available in a high strength condition attained by special processing techniques. Because high strength is produced by mill processing, hot forging or welding operations cannot be performed on this material without loss of strength. Aqueous corrosion resistance may also be lessened to varying degrees, depending upon the environment.

Table 43
Minimum Room Temperature Properties NITRONIC 60 HS Bars (Rotary Forge Only; Special Practice)
Diameter in (mm) UTS ksi (MPa) 0.2% YS ksi (MPa) Elongation % in 2" (50.8mm) Reduction of Area % Hardness Rockwell
2.5-5.0 incl (63.5-127) 110 (758) 90 (621) 20 45 C20
Over 5-6 incl (127-152) 110 (758) 70 (483) 20 45 C20
Over 6 Not Available
Table 44
Typical Mechanical Properties NITRONIC 60 H Bars*
Diameter UTS ksi (MPa) 0.2% YS ksi (MPa) Elongation % in 2" (50.8mm) Reduction of Area %
3.5" (88.9 mm) 120 (827) 93 (641) 21 27
* Room temperature. transverse direction. Pertains to all properties listed for HS material in this section. Values taken from tests on one heat.
Table 45
Effect of Temperature on Tensile Properties* NITRONIC 60 HS
Test Temperature, F° (C) UTS ksi (MPa) 0.2% YS ksi (MPa) Elongation % in 2" (50.8mm) Reduction of Area %
-320 (-196) 211 (1455) 132 (910) 28 16
-100 (-73) 165 (1138) 108 (745) 50 58
RT 127 (876) 96 (662) 37 60
200 (93) 118 (814) 87 (600) 44 59
300 (149) 108 (745) 77 (531) 43 61
400 (204) 103 (710) 74 (510) 39 61
600 (316) 99 (683) 71(490) 41 57
800 (427) 96 (662) 69 (476) 37 63
1000 (538) 91 (627) 68 (469) 31 62
1200 (649) 74 (510) 56 (386) 42 64
1400 (760) 44 (303) 31 (214) 63 83
*Typical values, longitudinal direction, duplicate tests.
Table 46
Typical Sub-Zero Impact Strength
NITRONIC 60 HS Bars (3.5" [88.9 mm] Diameter)
Test Temperature, F (C) Charpy V-Notch Impact, ft-lbs (J)
Longitudinal Transverse
RT 85 (116) 40 (54)
-50 (-46) - 21 (29)
-100 (-73) 43 (58) 18 (24)
-200 (-129) 34 (46) -
-320 (-196) 16 (22) 6 (8)
Table 47
Wear and Galling Properties
NITRONIC 60 HS Bars*
Couple (Hardness, Rockwell) Weight Loss, mg/1,000 Cycles
105 RPM 415 RPM
NITRONIC 60 HS (C29) -Self (C29) 2.94 1.70
NITRONIC 60 HS (C29) -17-4 PH (C43) 3.69 -
Threshold Galling Stress, ksi (MPa)
NITRONIC 60 HS (C29) - NITRONIC 60 (B95) 41 (283)
NITRONIC 60 HS - 17-4 PH (C43) 47+ (324)
NITRONIC 60 HS - NITRONIC 50 (C23) 49+ (338)
NITRONIC 60 HS - Type 316 (885) 36 (248)
NITRONIC 60 HS - 17-4 PH (C34)
(H 1150 + H 1150)
37 (255)
*Metal-to-metal wear-crossed cylinders.
Table 48
Sulfide Stress Cracking of HS Bars*
Applied Stress ksi (MPa) % Yield Strength Location Time to Failure Hours
97 (669) 100 Surface
Intermediate
Central
235
160
132
73 (503) 75 Surface
Intermediate
Central
302
208
227
58 (400) 60 Surface
Intermediate
Central
720 NF**
720 NF
720 NF
49 (338) 50 Surface
Intermediate
Central
720 NF
720 NF
720 NF
*NACE TM-01-77, Cortest Proof Rings, Yield Strength = 97 ksi (669 MPa)
**NF - No Failure
Table 49
Chloride Stress Corrosion Cracking Resistance NITRONIC
60HS*
Condition Hardness (HR) Result
Hot Rolled
0.1" (2.54 mm) thick strip
c36 No Failure
1950 F° (1 066 C) + 1300 F
(704 C) -10 min. -AC**
0.06" (1.5 mm) thick strip
B92 No Failure
1950 F° (1066 C) + 1450 F
(788 C) -10 min -AC**
0.06" (1.5 mm) thick strip
B92 No Failure
*U-Bends, 1-1/4" (6.96 mm) Diameter Mandrel -5% NaCI + 0.5% Acetic Acid, Boiling for
30 Days + 10% NaCI + 0.5% Acetic Acid, Boiling for 30 Days.
**Simulates partially sensitized condition often found in materials used in oil exploration equipment.

Physical Properties

Table 50
Physical Properties
Density at 75 F° (24 C) -- 7.622 g/cm3
Electrical Resistivity -- 98.2 microhm-cm
Modulus of Elastlcity -- 26.2 x 10⁶ PSI (180,000 MPa)
Poisson's Ratio -- 0.298
Table 51
Mean Coefficient of Thermal Expansion
Temperature, F° (C) in/in/F° (µm/m/C)
75-200 (24-93) 8.8 x 10⁶ (15.8)
75-400 (24-204) 9.2 x 10⁶ (16.6)
75-600 (24-316) 9.6 x 10⁶ (17.3)
75-800 (24-427) 9.8 x 10⁶ (17.6)
75-1000 (24-538) 10.0 x 10⁶ (18.0)
75-1200 (24-649) 10.3 x 10⁶ (18.5)
75-1400 (24-760) 10.5 x 10⁶ (18.9)
75-1600 (24-871) 10.7 x 10⁶ (19.3)
75-1800 (24-982) 11.0 x 10⁶ (19.8)
Table 52
Magnetic Permeability
Condition Magnetic Permeability
Annealed 1.003
25% Cold Drawn 1.004
50% Cold Drawn 1.007
75% Cold Drawn 1.010
Table 53
Magnetic Permeability of HS Bar*
Bar
Location
Field Strength, Oersteds (Ampere/Metres)
100 (7,958) 200 (15,916) 500 (39,790) 1,000 (79,580)
Surface 1.0009 1.0040 1.0029 1.0029
Intermediate 1.0003 1.0022 1.0039 1.0029
Central 1.0013 1.0024 1.0033 1.0031
*ASTM A342, Method 4
Table 54
Dynamic Coefficient of Friction
Alloy Dynamic Coefficient of Friction*
Test Stress Level, N/mm2
0.8 5.6 14.0 28.0 56.0 112.0
NITRONIC 60 .50 .35 .38 .44 .44 .44
Stellite 6B .30 .60 .63 - - -
NITRONIC 32 - - .45 .53 .65 .58
*Tested in water at 20 C, self-mated.
Table 55
Dynamic Coefficient of Friction
Ring on Block (15-45lbs [67-200 N])*
Ring Block Coefficient of Friction
Type 440C NITRONIC 60 0.4 in Argon
0.4 in Air
Type 440C Type 304 0.4 in Air
Type 440C Type 316 0.5 in Air
Taken from: "Friction, Wear, and Microstructure of Unlubricated
Austenitic Stainless Steel," by K. L. Hsu, T. M. Ahn, and D. A. Rigney,
Ohio State University, ASME Wear of Materials--1979.
Machinability
Table 56
Machinability*
ANSI B 1112 Type 304 NITRONIC 60
100% 45% 23%
*1" dia. (25.4 mm)--annealed--RB 95
Five-hour form tool life using high-speed tools
Data based on duplicate tests

Suggested Machining Rates

Because of desirable metallurgical characteristics of NITRONIC 60, machinability is not easy. However, with sufficient power and rigidity, NITRONIC 60 Stainless Steel can be machined. It is suggested that coated carbides be considered for machining.

NITRONIC 60 machines at about 50% of the rates used for Type 304; however, when using coated carbides, higher rates may be realized. Suggestions for starting rates are:

Single Point Turning Roughing

0.150" depth --0.015"/rev feed --175 SFM

Finishing

-- 0.025" depth --0.007/rev feed --200 SFM

Drilling

1/4" diameter hole --0.004" /rev feed --60 SFM 1/2" diameter hole--0.007"/rev feed -60 SFM 3/4" diameter hole-- 0.010"/rev feed --60 SFM

Reaming

-feed same as drilling --100 SFM These rates are suggested for carbide tools, Type C--2 for roughing, drilling, and reaming. Type C--3 for finishing.

Side and Slot Milling Roughing

-0.250" depth -0.007"/tooth feed -125 SFM

Finishing

-0.050" depth -0.009"/tooth feed -140 SFM

Welding

NITRONIC 60 stainless steel is readily welded using conventional joining processes. Autogenous welds made using the Gas Tungsten-Arc process are sound, with wear characteristics approximating those of the unwelded base metal. Heavy weld deposits made using the Gas Metal-Arc process and the matching weld filler are also sound, with tensile strengths slightly above those of the unwelded base metal. Wear properties are near, but slightly below those of the base metal. Weld properties compared to unwelded base metal are shown in Table 57.

The use of NITRONIC 60 stainless steel for weld overlay on most other stainless steels and certain carbon steels develops sound deposits having properties about equal to that of an all weld deposit.

The American Welding Society has included NITRONIC 60W bare wire in AWS A5.9 as ER 218 alloy.

Table 57
Comparative Properties of Base Metal vs.
Weld Metal
UTS ksi (MPa) O.2%YS ksi (MPa) Elongation %in2" (50.8 mm) Red. of Area% Hardness Rockwell Impact Charpy
V-Notch ft-Ibs (J)
Galling Stress NITRONIC60
vs.
NITRONIC60 ksl (MPa)
As-Welded Weld Metal G.M.A. 123 (848) 85 (586) 19 22 c25 Temperature, F° (C) 54 (73)
11 (15)
40 (276)
Room -320F° (-196C)
Annealed Base Metal 103 (710) 60 (414) 64 74 B95 Room -320F° (-196C) 240 + (325)
144 (195)
50+ (345)
+ Did not gall

Following are examples of the excellent galling resistance of NITRONIC 60 in the as-deposited, weld overlay condition.

Table 58
Intergranular Corrosion Resistance of NITRONIC 60 Weld Overlay on Type 304*
Condition Corrosion Rate. inches/month
As-deposited 0.0016
1700 F° (927 C) -- 1 hr -- WQ (stress relief) 0.0020
1700 F° (927 C) -- 1 hr -- AC (stress relief)) 0.0063
*2 layers of NITRONIC 60 Stainless, gas metal-arc process. ASTM A 262 Practice B (Ferric Sulfate)
Intergranular corrosion per ASTM A262 - applicable to annealed material.
Table 59
Typical Elevated Temperature Properties*
Cast NITRONIC 60 (CF10SMnN) Annealed
Test Temperature, F°(C) UTS ksi (MPa) 0.2% YS ksi (MPa) Elongation % in 2" (50.8 mm) Reduction of Area %
75 (24) 96 (662) 47 (324) 54 55
200 (93) 85 (586) 37 (255) 61 61
400 (204) 72 (496) 28 (193) 62 64
600 (316) 67 (462) 24 (165) 60 60
800 (427) 63 (434) 23 (159) 58 64
1000 (538) 61 (421) 23 (159) 57 64
1200 (649) 55 (379) 23 (159) 50 57
*Average of 4 tests
Table 60
Stress Rupture Strength*
Cast NITRONIC 60 (Annealed)
Test Temperature, F°(C) Stress ksi (MPa) Time to Failure hours Elongation % in 2" (50.8 mm) Reduction of Area %
1200 (649) 25 (172) 348 32 53
30 (207) 108 29 48
35 (241) 34 23 31
*Average of tests of 11 heats
Data supplied by Wisconsin Centrifugal Inc.
Table 61
Typical Room Temperature Mechanical Properties
6" (152 mm) Square Cast NITRONIC 60 Stainless Steel
Condition Location UTS ksi (MPa) 0.2% YS ksi (MPa) Elongation % in 2" (50.8 mm) Reduction of Area. % Hardness HRB CVN Impact ft-lbs (J)
As-Cast Surface 98 (676) 49 (338) 43 34 91 37(50)
As-Cast Intermediate 73 (503) 49 (338) 12 15 89 27(37)
Annealed (Surface) 2000 F° (1093 C) 101 (696) 48 (331) 62 67 91 162 (220)
Annealed (Intermediate) 2000 F° (1093 C) 96 (662) 46 (317) 54 56 89 -
Average of tests of 11 heats
Data supplied by Wisconsin Centrifugal Inc.
Table 62
Typical Impact Strength
Simulated Slow Cool in Mold Study*
Test Temperature, F°(C) Charpy V-Notch
Impact ft-lbs (J)
73 (22.8) 21.5 (29.2)
60 (15.6) 37.5 (50.8)
* Cast 9" (225 mm) square x 4" (100 mm) thick section, center cooled from
2050 F° to 357 F° (1121 C to 191 C) for 2 hours in still air.
WELDING GUIDELINES FOR NITRONIC 60
General Welding
NITRONIC 60 stainless steel is readily welded using conventional joining processes. NITRONIC 60 is an austenitic stainless steel and can be handled in the weld shop like AISI 304 and 316. No preheat or post-weld heat treatments are considered necessary other than the normal stress relief used in heavy fabrication. The nature of NITRONIC 60 applications suggests that most uses would occur in the as-welded condition except where corrosion resistance is a consideration.
Fillerless fusion welds (autogenous) have been made using the gas tungsten arc process. The STA welds are free from cracking and have galling and cavitation resistance similar to the unwelded base metal. Heavy weld deposits made using the gas metal arc process are sound and exhibit higher strength than the unwelded base metal. The metal-to-metal wear resistance of the GMA welds is slightly lower than the base metal heat resistance. Detailed test results of weld metal properties are listed in Table 5 of the NITRONIC 60 product data bulletin.
Although no first-hand dissimilar weld data is available from our Armco welding laboratories, past experience suggests that NITRONIC 60 can be welded to both AISI 316 and 400 series stainless steels with Type 309 welding wire. The usual handling procedure for welding 400 series alloys would probably dictate fabricating sequence in many cases, but most specific applications require individual fabrication plans
Repair Welding of NITRONIC 60 Castings
A simulated repair weld has been completed on a 4"x 9"x 9" section of as-cast NITRONIC 60. The welded joint was prepared by manually air-carbon-arc gouging a "V" groove and then grinding to remove carbon deposits. Developmental AMAW electrodes were used under the following conditions:
Welding Current 130-140 Amps
Welding Voltage 26-28
Travel Speed About 8-10"/min.
Preheat Temp. Room Temp.
Interpass Temp. 300F° Max.
Post Weld Heat Treat None
Electrode Diameter 5/32"
Groove Depth 1 to 1.25"
After cooling to room temperature, the weldment was sectioned in several locations and dye penetrant inspected. No evidence of cracking was observed in any section.
WELDING GUIDELINES FOR NITRONIC 60 (CONTINUED)
NITRONIC 60 Weld Overlay of Wrought and Cast Steels
Bare wire, .062" diameter, is the most common size available for use with any filler added process that uses an inert gas shield like Gas Metal Arc, Gas Tungsten Arc, Plasma Arc, Laser, etc. The Gas Metal Arc Process may be used in any one of three modes for overlay welding; spray arc, shorting arc and pulse arc. General guidelines for the use of each are given in Table 63.
While the use of any inert gas shielded process is considered applicable for deposition, the metallurgical considerations pose a serious limitation. For example, the Gas Tungsten Arc Process with a cold wire feed, is not recommended because of the inherent high base dilution effects that make it virtually impossible to get a sound overlay - even with sub layer practices. The hot wire version of the Gas Tungsten Arc Process may work if properly controlled. Very high arc current to hot wire current rations would have to be used to get a low base dilution (should be 25% or less). Possible parameters for a hot wire application are shown in Table 63. The intergranular corrosion resistance of NITRONIC 60 as a weld overlay on AISI 304 appears satisfactory even in the as deposited condition.
Table 63
Welding Guidelines
Gas Shield Metal Arc Gas Shield Tungsten Arc
Spray Arc Shorting Arc Pulse Arc Hot Wire Feed
Gas Shield Argon or Argon + 2% O2 Argon or Argon + 2% O2 or He 90%, Ar 7.5%, CO2 2.5% Argon or Argon + 2% O2 Argon
Gas Flow 30 CFH 30 CFH 30 CFH 30 CFH
Voltage 28032 19-22 Avg. 17-19 18
Current (Amps) 275-300 120-160 160-260 200
Weld Travel Speed 15"/min. 15"/min. 15"/min. 15"/min.
Wire Feed Speed Adjust to give desired current Adjust to give desired current Adjust to give desired current 75"/min.
Hot Wire Current - - - 150 Amps
Contact Tube Should extend 1/8" out from edge of gas cup Should extend 1/8" out from edge of gas cup Should extend 1/8" out from edge of gas cup -
Contact Tube to Arc Distance Stick-out should be minimal (3/8" to 1/2") Stick-out should be minimal (3/8" to 1/2") Stick-out should be minimal (3/8" to 1/2") -
Interpass Temp. (F°) Room to 350 Room to 350 Room to 350 Room to 350;
Avg. Base Dilution About 25% About 15% About 15% 35%
Layers Suggested 2 1 (?) 2 1 (?) 2 2
General comment about SMAW: Single layers with all three modes will give sound deposits. The spray arc process requires two layers due to the higher dilution. This will bring the surface closer to the original wire composition for optimum wear performance.
HIGH PERFORMANCE
ALLOYS, INC.
1985 E. 500 N.
Windfall, IN 46076
Phone 765-945-8230
Fax 765-945-8294
E-mail sales@hpalloy.com
Website www.hpalloy.com
1-877-472-5569
NITRONIC is a Registered trademark of AK Steel (Armco).